Data – Exporting, Collating and Cleaning Up
Much as there are differences between the conduct of searches in BoB and TRILT, there are also differences in the way that search result data are exported. It is important to note that there are also differences in the ways that export is conducted on Macintosh computers and Windows PCs. The following notes will endeavour to present a clear guide whichever machine you are working on.
Exporting and Importing – TRILT
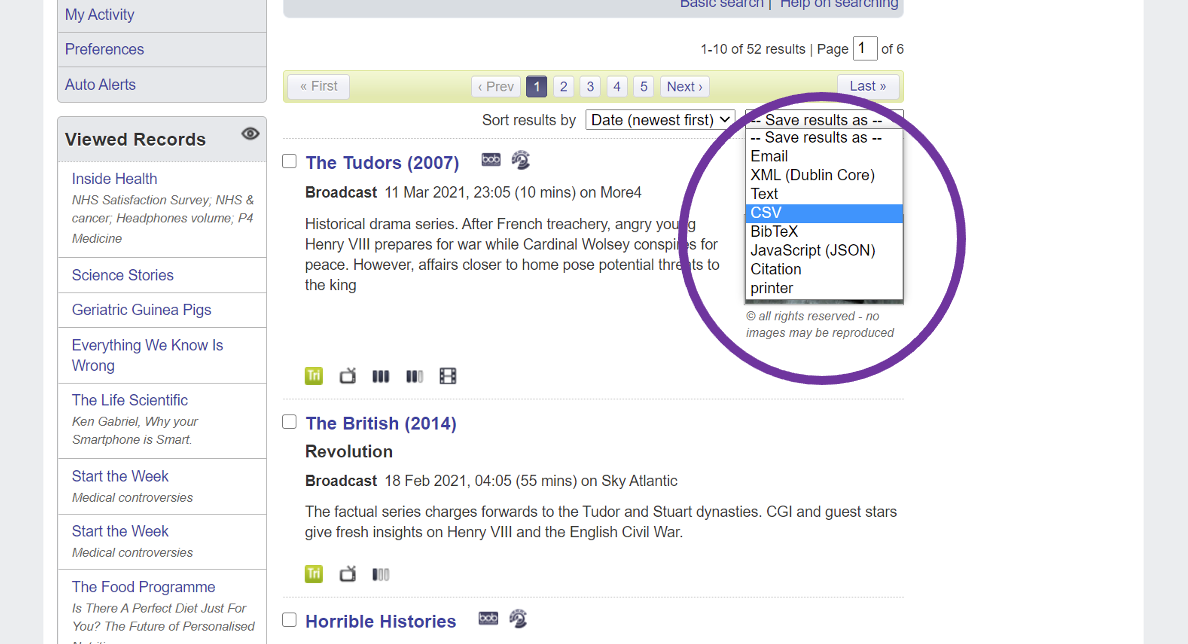
Using the “Save results as” feature located at the top of the results (Figure 3), export the results as a CSV file – if using Windows, this file can be found in the Downloads folder of your documents. Tip: It can be helpful to move the results files from Downloads into a dedicated folder and rename each file to the search term used (it automatically saves as the date) e.g. “20201006” to “Henry VIII AND War”.
Figure 3: Export data from TRILT as a CSV file
It is important to note that the “Save results as” feature is not available if there are more than 100 matches for a given search. To avoid having to manually transfer the information, you will need to use a workaround. We suggest, again, the use of a series of consecutive date ranges to break the results into manageable aliquots.
The next step is to import the results files into Excel. At this point the details of how to undertake the transfer are different for Windows and for Mac users.
-
Open Excel and click on the “Data” tab.
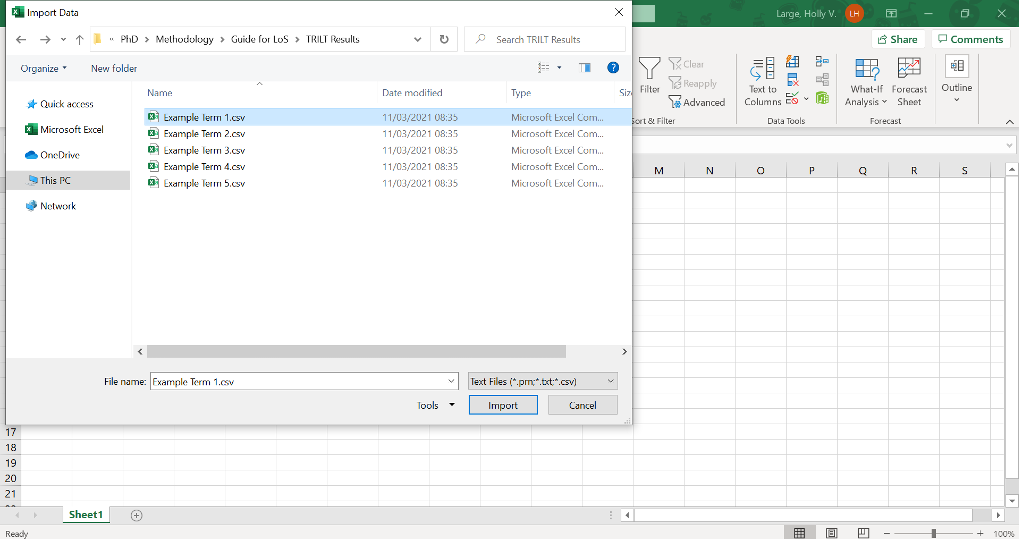
Click “From Text/CSV” and a pop-up box of your documents will appear.
Go to the designated folder, click on the results file to be imported and then click “Import”. NB: only one file can be imported at a time.
Figure 4: Exporting files to Excel in Windows
- Another pop-up will appear with a summary of the data in the CSV file. On the bottom right-hand side of this pop-up, click “Load” (Figure 5) – the data will then appear in the spreadsheet (Figure 6).
Figure 5: Transferring data from CSV file to Spreadsheet using the “Load” button (in Windows)
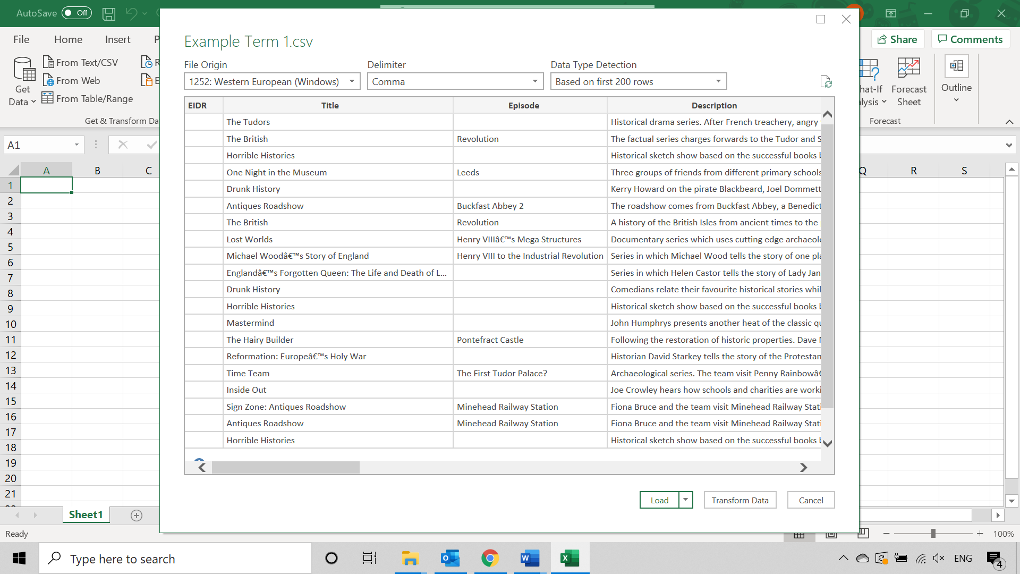
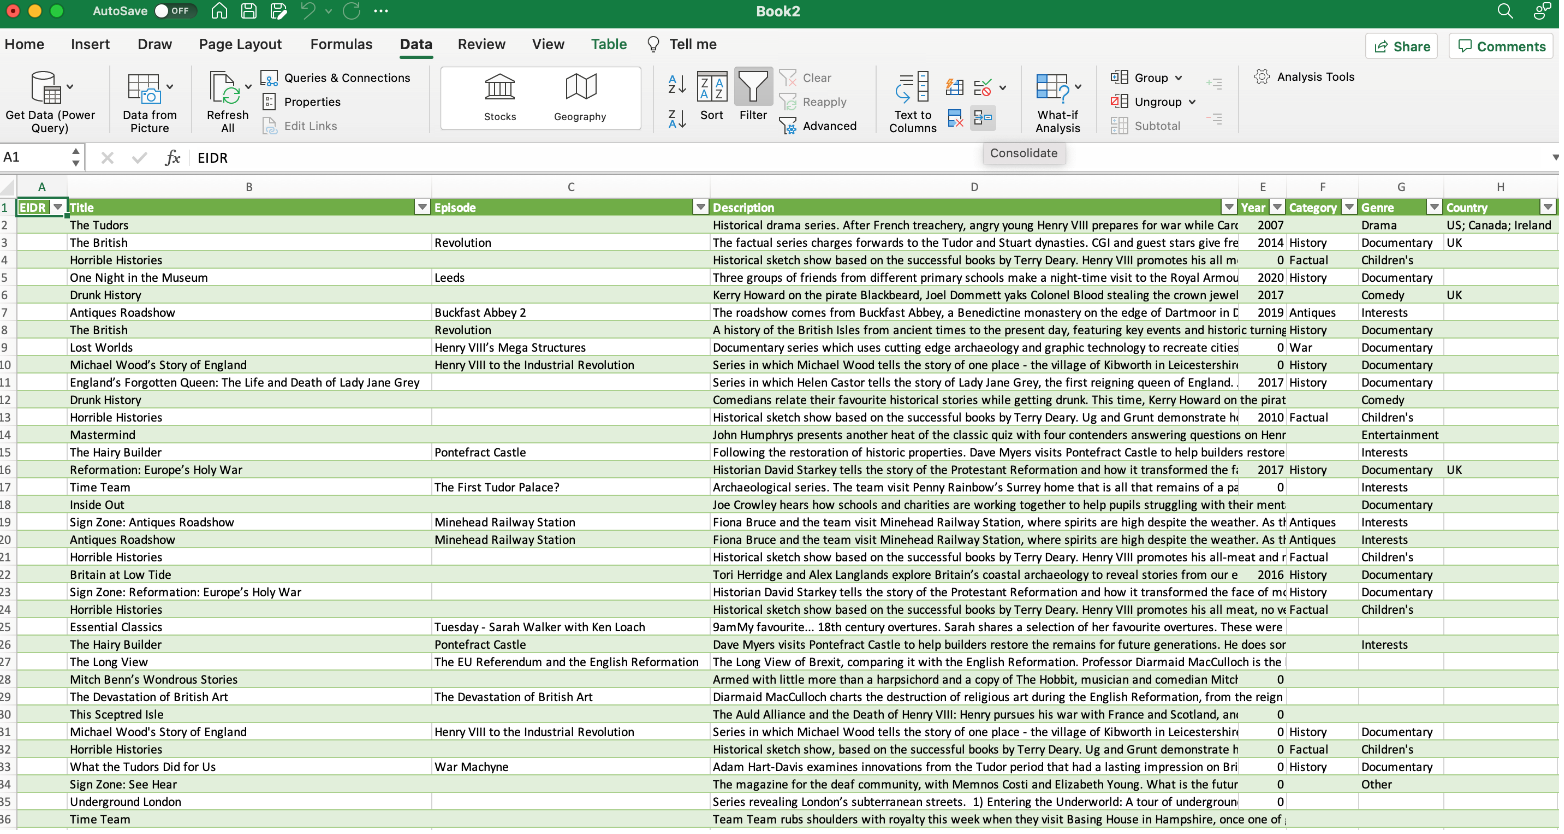
Figure 6: Appearance in Excel Spreadsheet after transfer (in Windows)
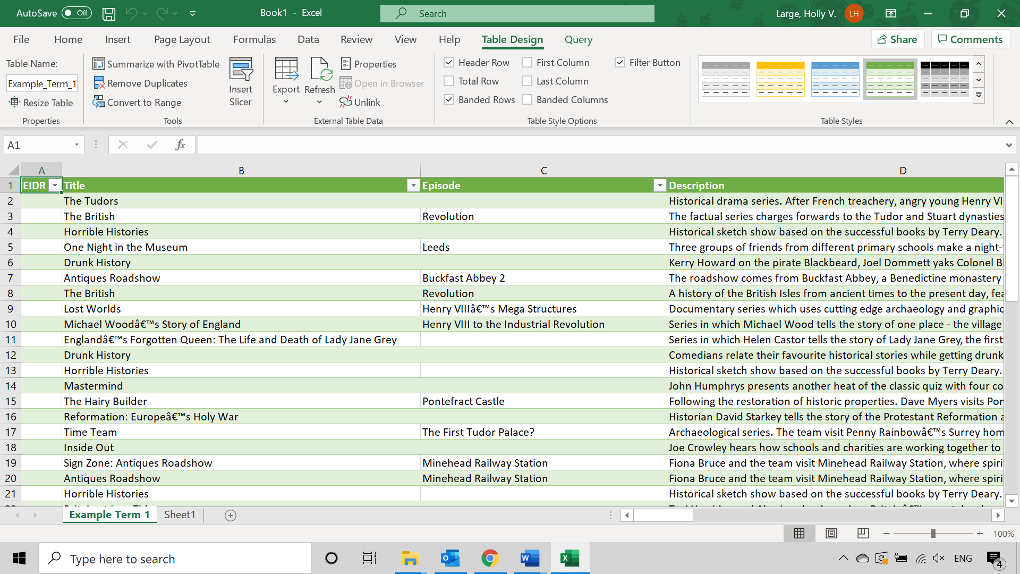 Note: Users ought to be aware that exporting from TRILT sometimes introduces peculiar symbols. Examples can actually be seen here in rows 9,11, 16 and 17. These are easily edited out after transfer.
Repeat steps 2-4 for each of the search terms and the data will appear in individual sheets.
To begin bringing all the data together into a single sheet, select the “Data” tab, then click “Queries & Connections”.
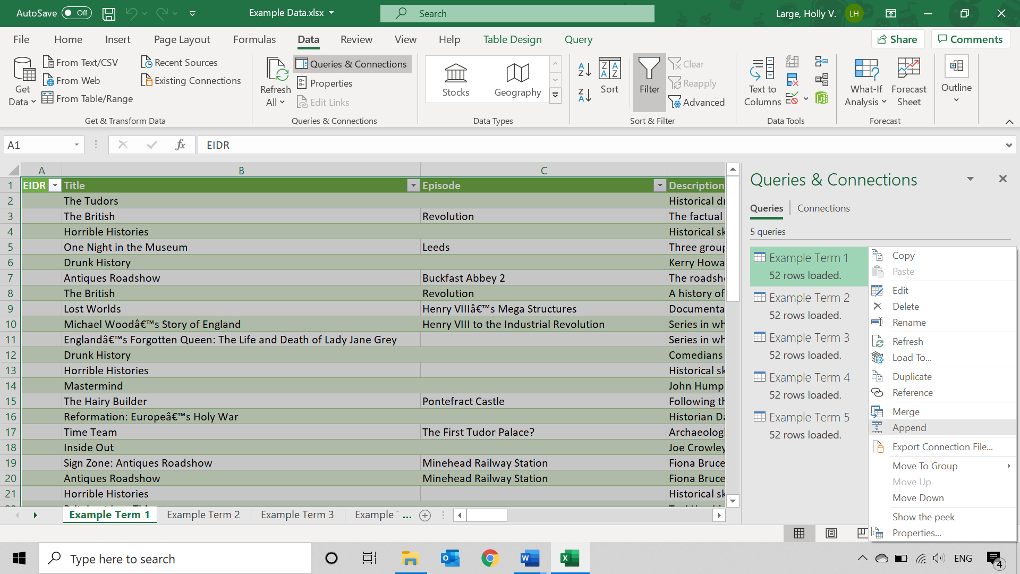
Right click the first search term (e.g. Example Term 1) and click “Append” (Figure 7) .
Figure 7: Bringing all of the data into one sheet (in Windows)
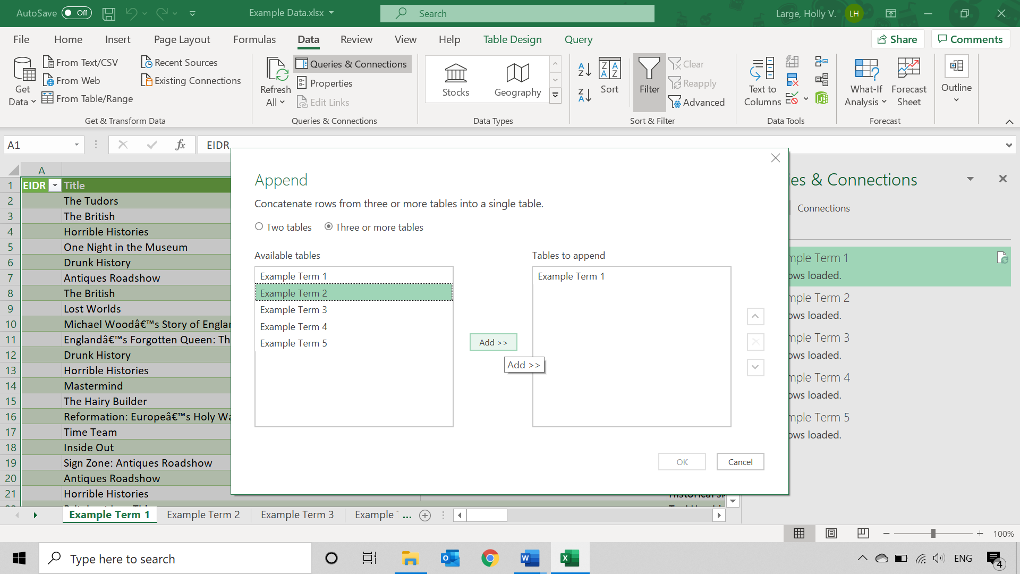
- Select “Three or more tables” and then add to the box on the right-hand side, ensuring that each search term is present, then click ‘OK’ (Figure 8).
Figure 8: Drawing results from different tables into one spreadsheet
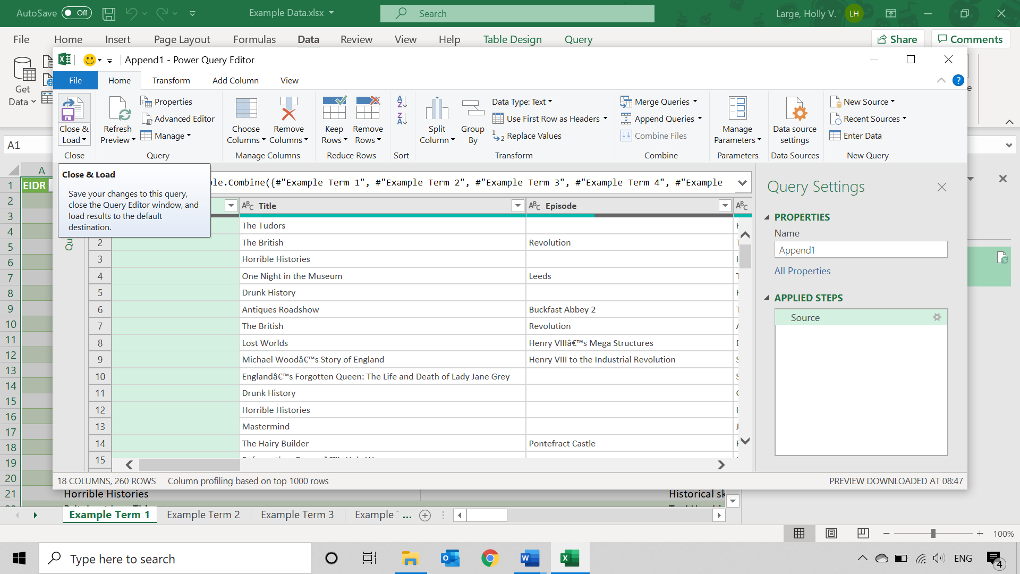
- Another pop-up will appear – check that all the data are there, then click “Close & Load” (Figure 9).
Figure 9: Complete the process by selecting “Close & Load”
- The compiled table will load in a separate sheet – the other sheets can then be deleted if appropriate.
-
Open Excel and click on the “Data” tab.
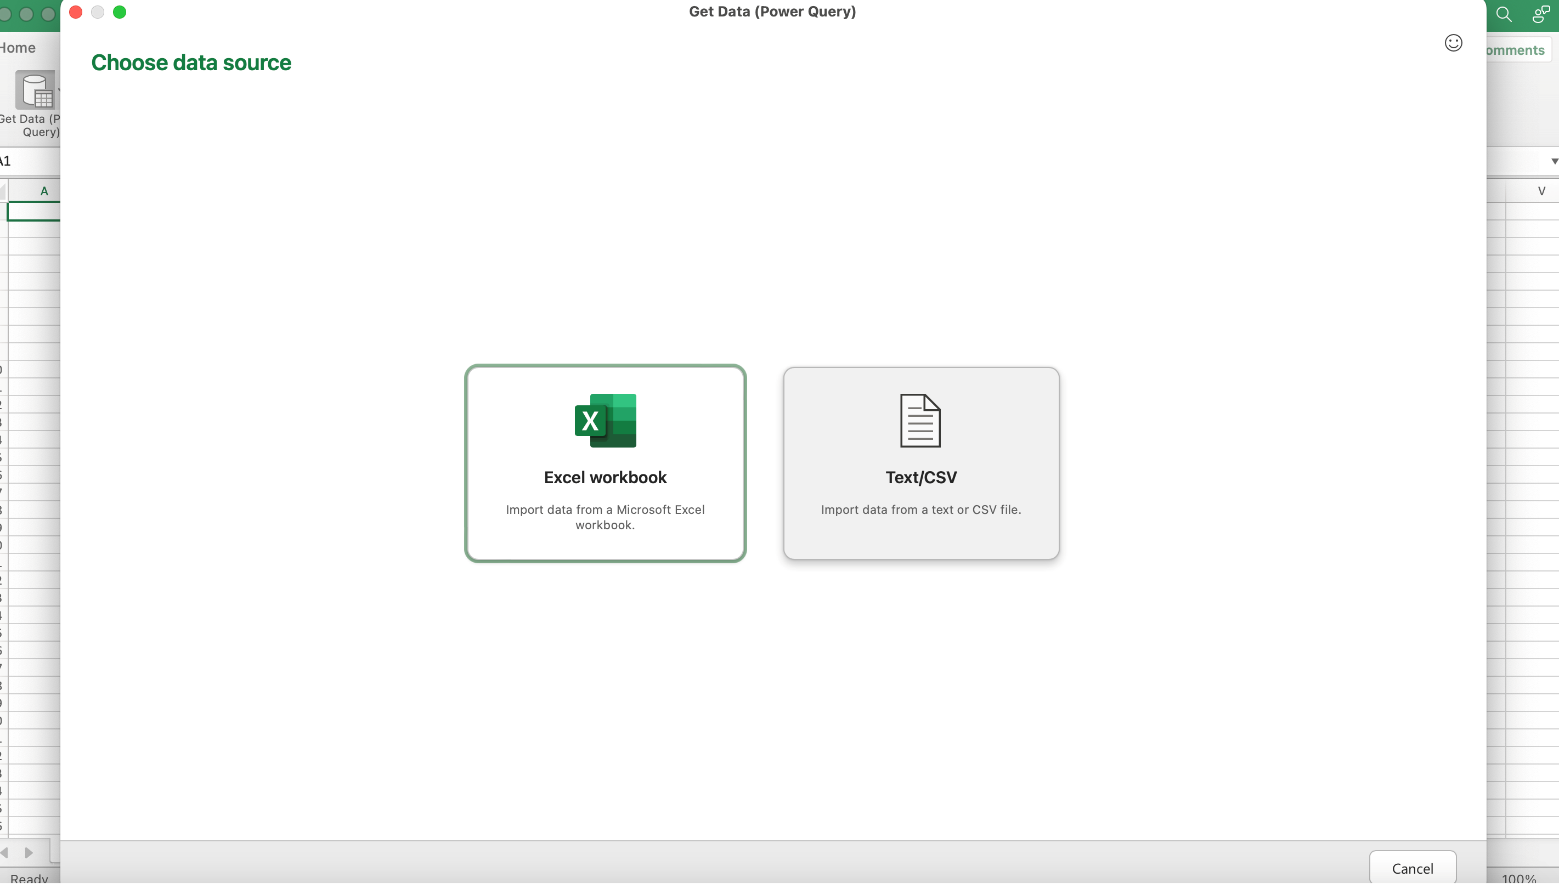
Click “Get Data (Power Query)” (Figure 10) and a pop-up box will open asking you to choose a data source - click “Text/CSV” (Figure 11).
Figure 10: Select “Get Data (Power Query)” on Mac
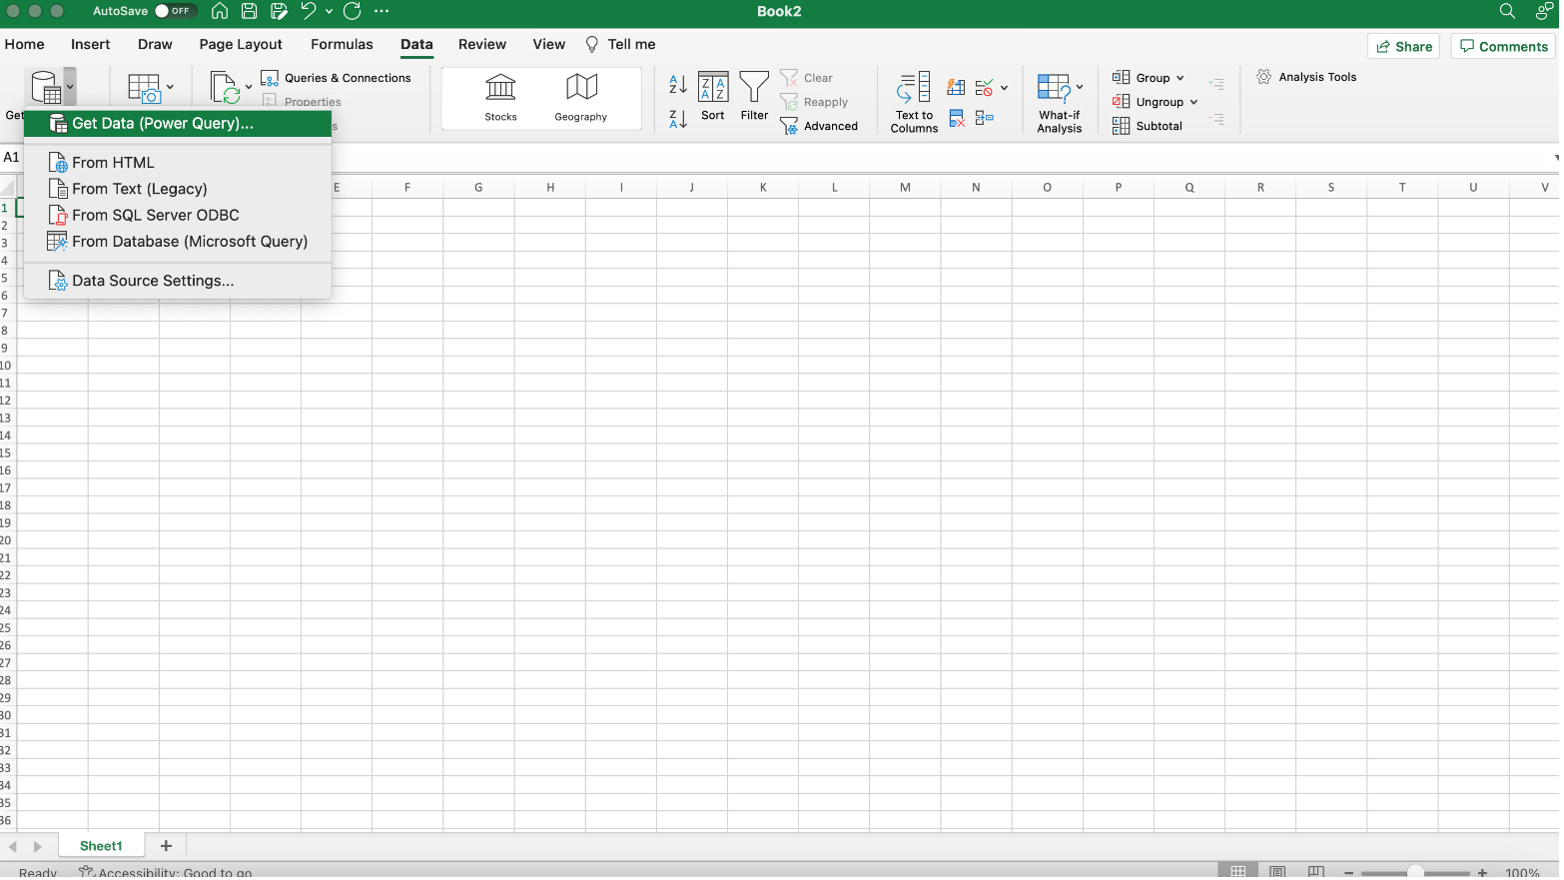
Figure 11: Choose “Text/CSV” as source of data to import (on Mac)
Click “Browse” and a pop-up box of your documents will appear.
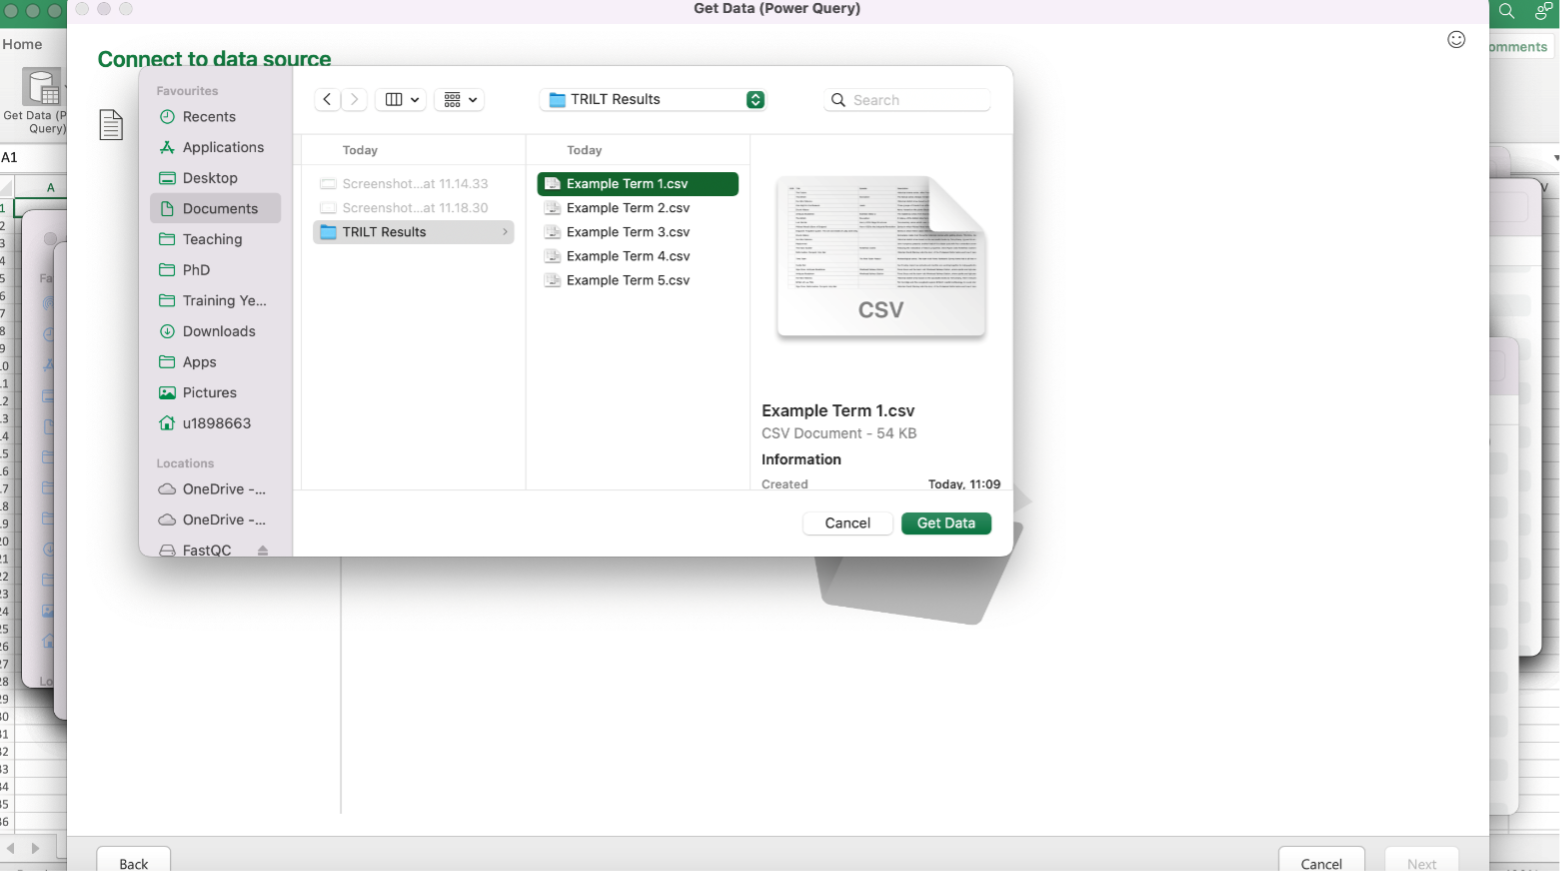
Go to the designated folder, click on the results file to be imported, click “Get Data” and then “Next”. NB: only one file can be imported at a time (Figure 12).
Figure 12: Selection of relevant data file to import (on Mac)
- Another pop-up will appear with a summary of the data in the CSV file (Figure 13). On the bottom right-hand side of this pop-up, click “Load” – the data will then appear in the spreadsheet (Figure 14).
Figure 13: From the preview file page, choose “Load” to complete the import (on Mac)
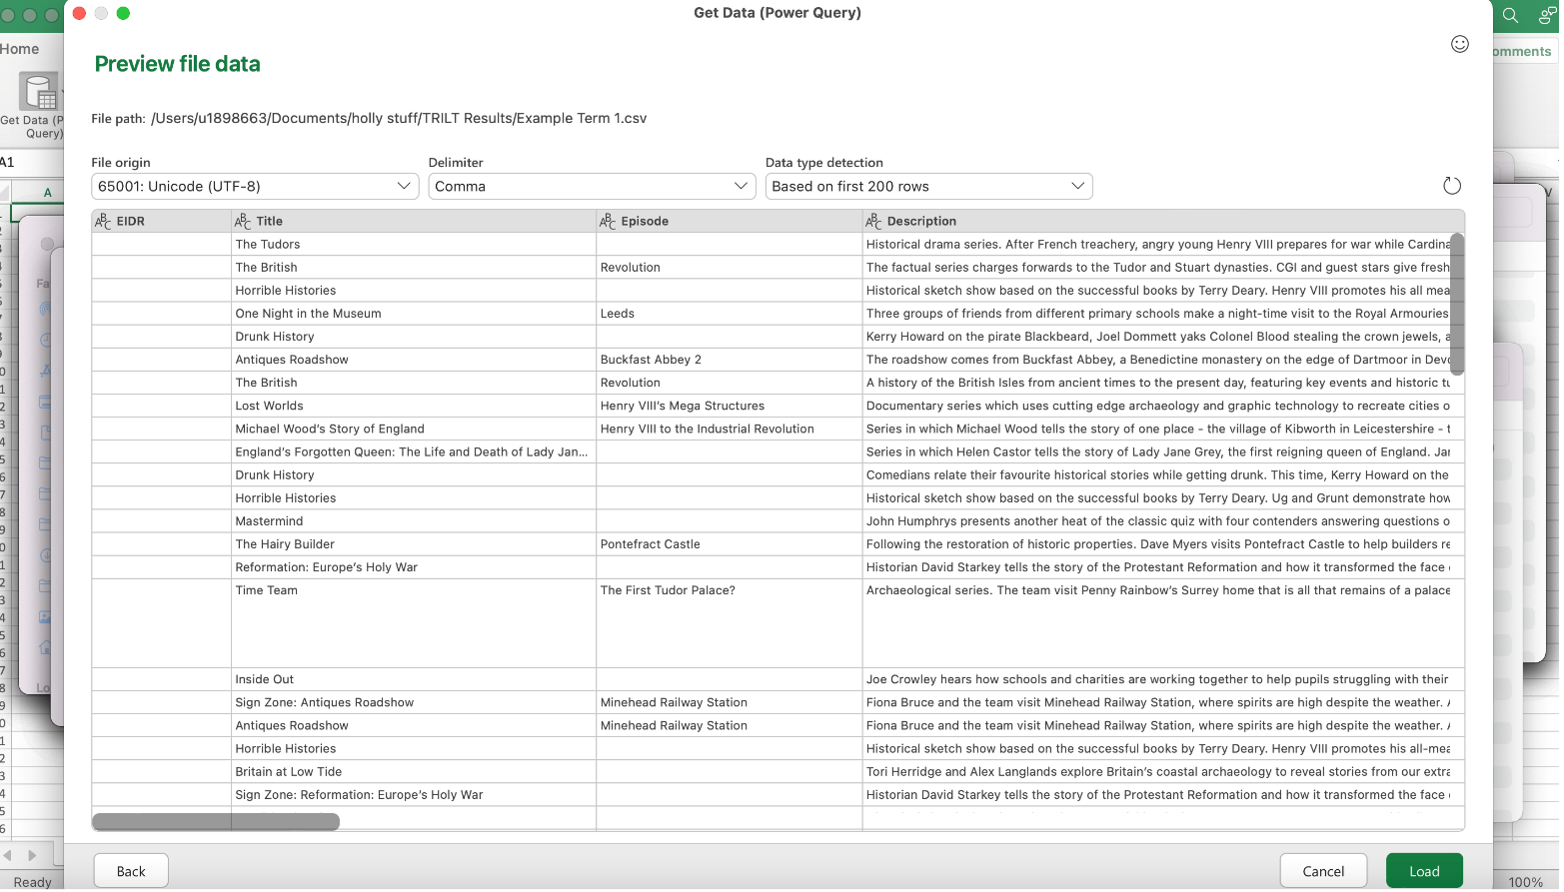
Figure 14: The completed file import from TRILT to Excel (using a Mac)
Repeat steps 2-5 for each of the search terms and the data will appear in individual sheets.
In contrast to Windows, to bring all the data together into a single sheet, it will need to be copied and pasted.
Exporting and Importing – BoB
Unlike TRILT, search results from BoB cannot presently be converted into Excel-ready files for export. This means that your search results will need to be inputted manually into the spreadsheet. Whilst this may take longer than exporting results from TRILT and can be prone to human error, there are ways to make the process smoother.
Open the first search result in a new tab of your browser.
On the individual result page, click “Add to a playlist” and create a new playlist named after the search term (Figure 15).
Figure 15: Programmes can be added to as many playlists as you want, to maximise later re-discovery 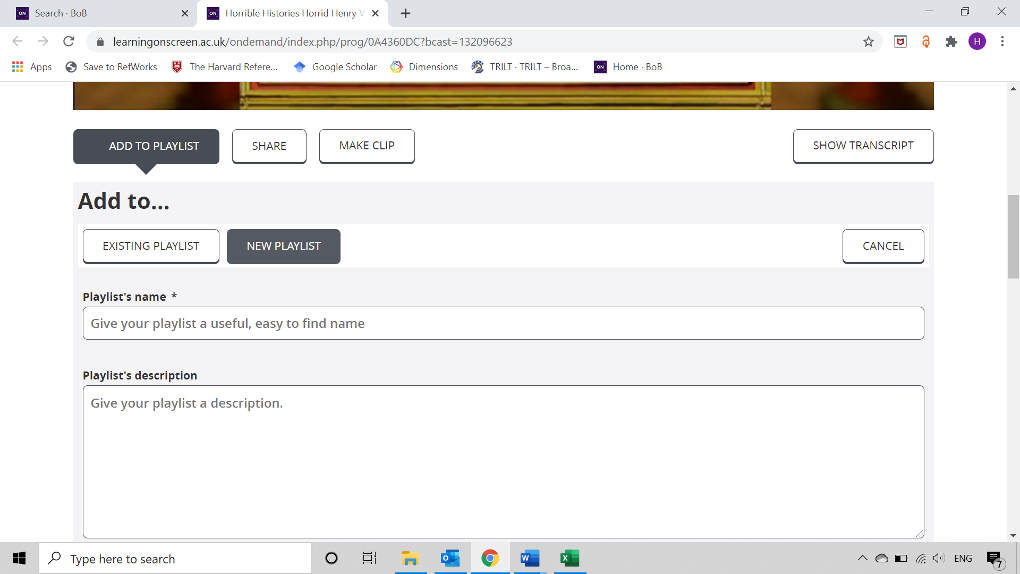
Return to the results page, open the next result and add to the playlist you have just created – repeat this for all of the available results. As noted previously, only the first 1000 results are available to view on BoB, therefore if you really need details of all transmissions (a lot of data!) you will need to apply a filter such as a set of consecutive date ranges to generate a full list. Creating such a playlist compiles the results of each individual search term in a place that is easy to find, doesn’t require searching again and reflects the results at the time of searching (repeating the same search at a later date may produce a different number of results due to newer programmes being added, for example).
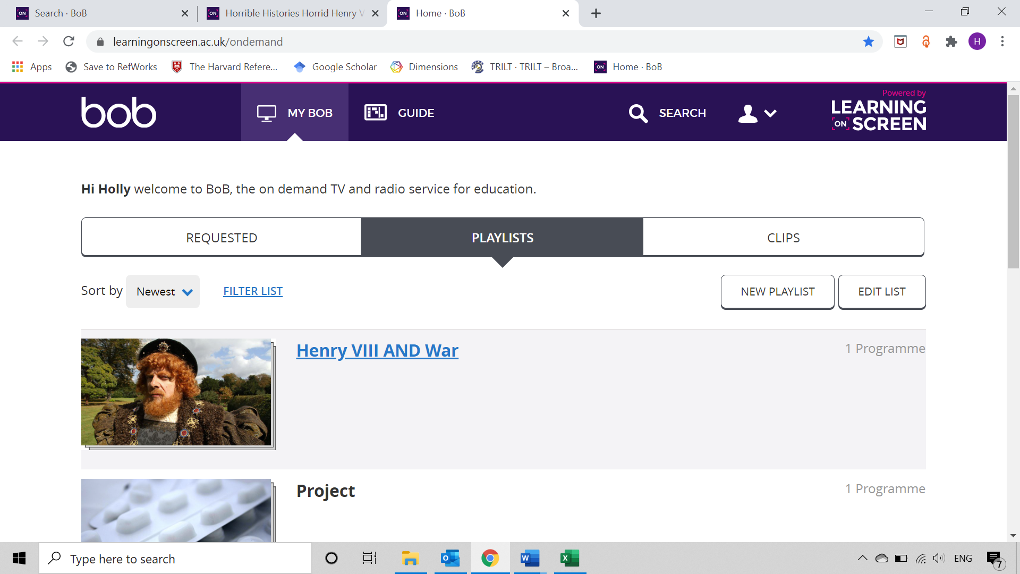
To find your playlists, click “My BoB” and then select the “Playlists” tab (Figure 16).
Figure 16: The “Playlists” feature enables you to store programme records where you want them
Open the playlist and go through each programme information page – this page contains the same information that can be found when exporting results from TRILT e.g. Title, Episode, Duration, Broadcast Date etc.
Copy the information you require across to your Excel spreadsheet.
Excluding duplicate results
Although ‘Show only latest broadcast’ can be selected in TRILT, that feature is used automatically unless selected otherwise in BoB. Despite this, duplicate results may appear in the overall initial dataset. There are several potential reasons for this:
It is also worth alerting users to the fact that some series are given a generic ID. For example, for ITV News London: the ID 16F3C6EC is used across many broadcasts. If your search results include several entries for ITV News London code 16F3C6EC but with different transmission dates, these will likely be unique broadcasts in spite of the title/ID combination suggesting otherwise. Some caution is therefore necessary when removing duplicates. Notwithstanding these caveats, duplicates should be excluded in order to reflect the true number of unique results. This can be done using the Programme ID, which is the same for a programme in both BoB and TRILT e.g. the ID for “Time Team – The First Tudor Palace?” is 00578A53 in both BoB and TRILT.
-
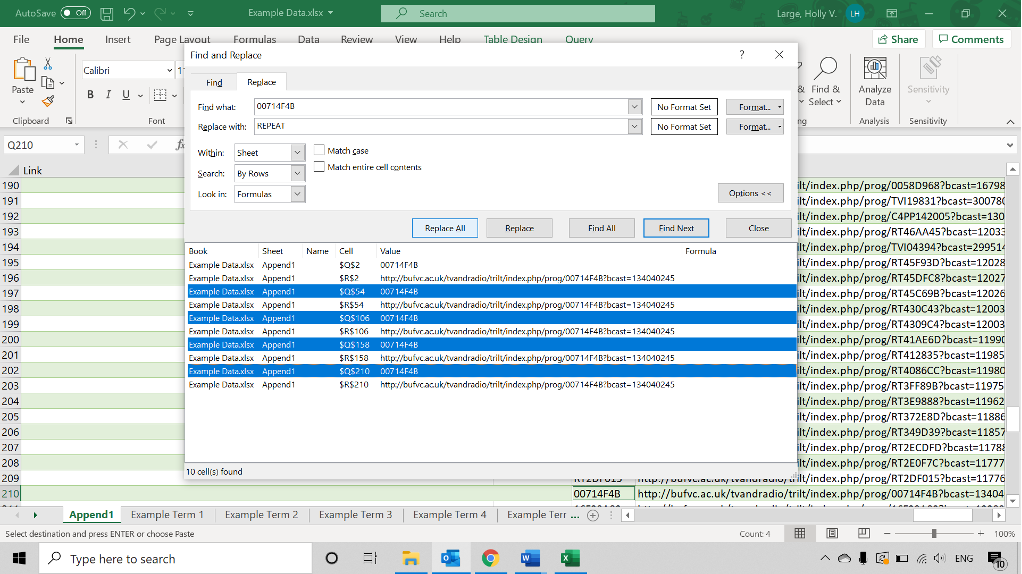
- In Excel, click “Find & Select”, then “Replace”, which opens the “Find & Replace” tool – this can be accessed as seen in the image below or by CTRL+H. This will open a pop-up box. (Figure 17).
Figure 17: Using the “Find and Replace” tool to help eliminate duplicates
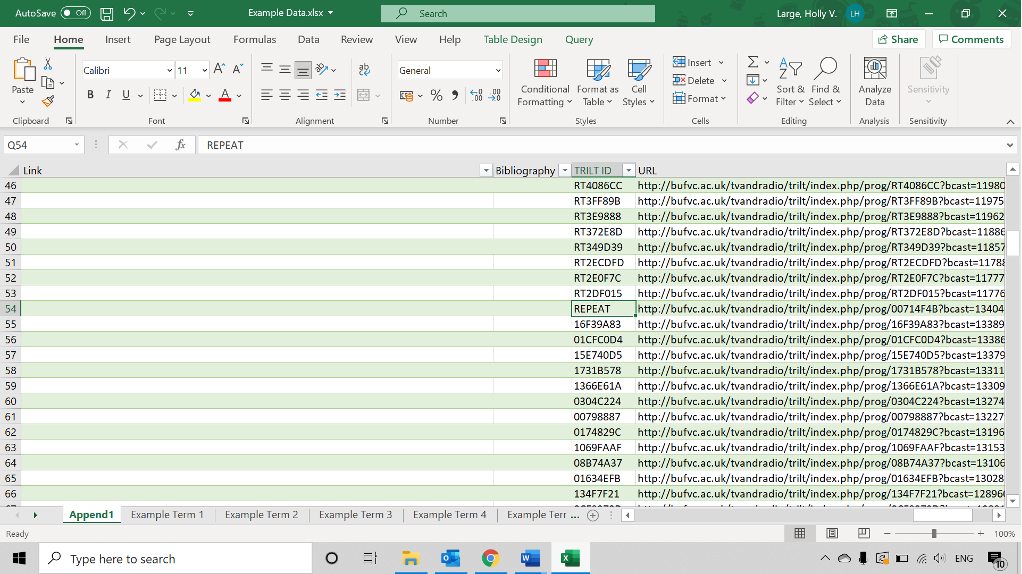
In the “Find what:” box, enter the programme ID of the first result in the table, in the “Replace with:” box, enter REPEAT.
Click “Find All” – this will show you all of the instances where the ID appears in the table (the ID also appears in the URL of the programme, but this can be ignored, as the duplicate will have been indicated in the programme ID column).
Select all but the URLs and the first incidence of the ID (CTRL + left click), then click “Replace All”, then “OK” (Figure 18).
Figure 18: Use the “Replace All” feature to cut down duplicates
- If you close the pop-up, you can see that duplicate IDs have been replaced by “REPEAT” – where this has occurred, the duplicate result can be manually removed. This can be done before or after the above steps have been repeated for each new programme ID (Figure 19).
Figure 19: If conducted correctly, likely duplicate should now be flagged as “REPEAT”
Duplicates that have occurred as a result of being Sign Language enabled (they have different programme IDs but are the same programme) can also be highlighted, if you wish to do so, by using the “Find & Replace” tool; in the “Find what:” box, enter Sign Zone and in the “Replace with:” box, enter REPEAT and then follow steps 3-5 above.
-
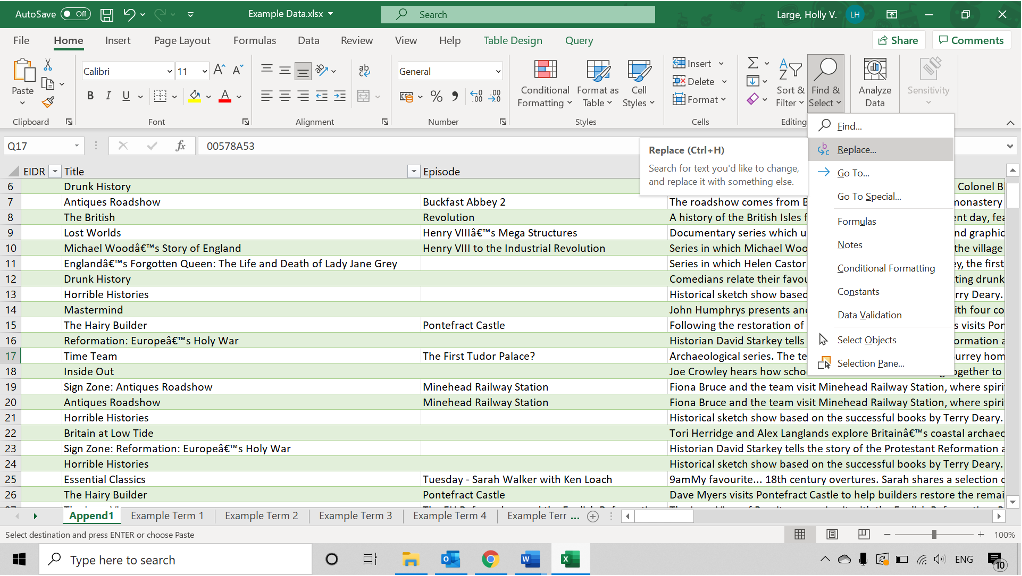
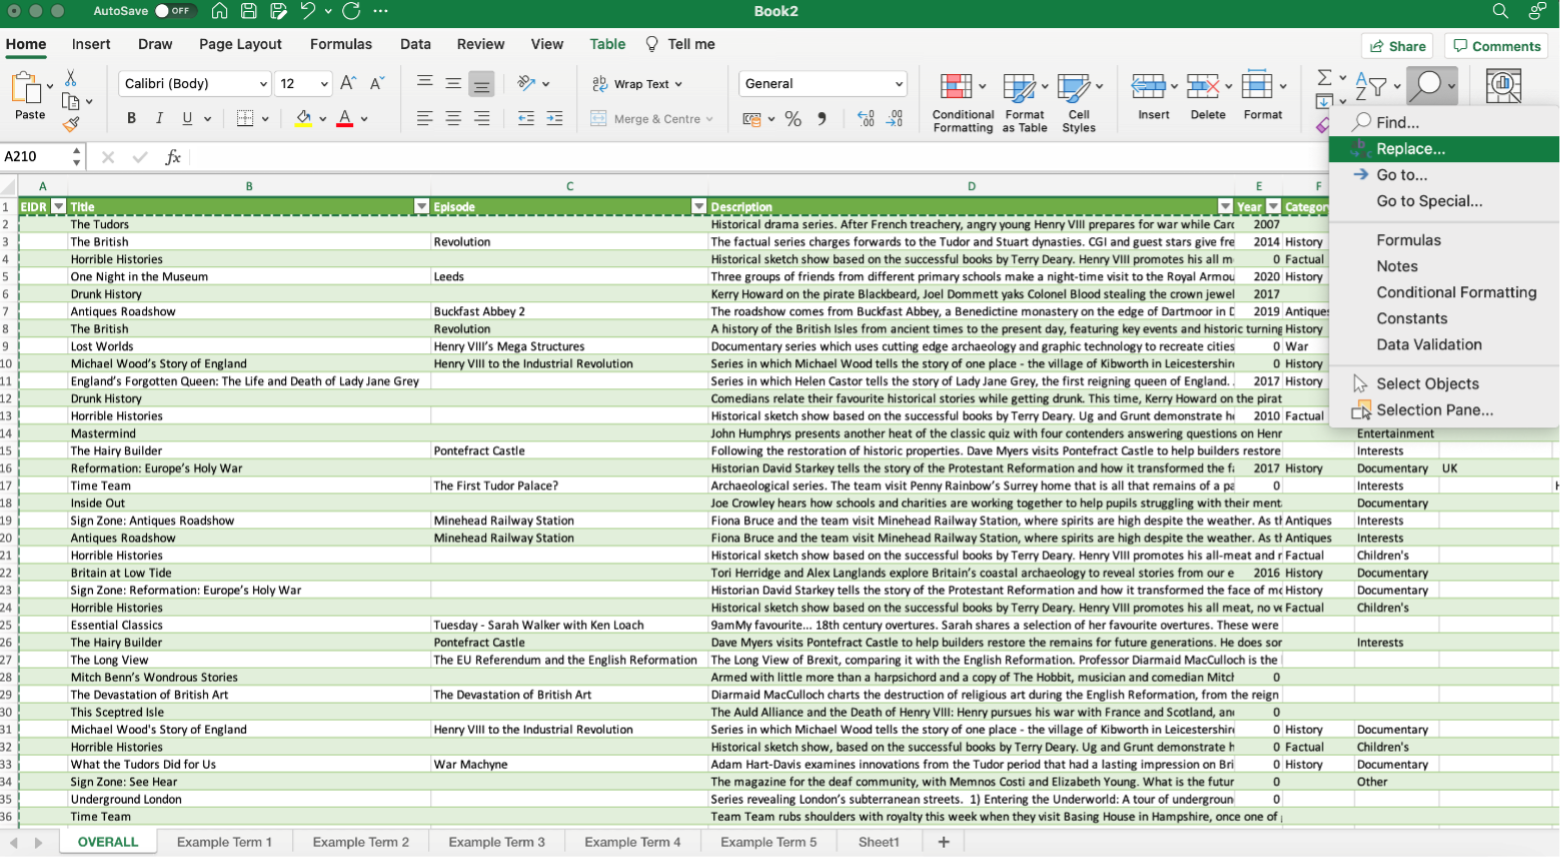
- In Excel, click “Find & Select”, then “Replace”, which opens the “Find & Replace” tool – this can be accessed as seen in Figure 20 or by CTRL+H. This will open a pop-up box.
Figure 20: The “Find and Replace” tool can also be used on Macs
- In the “Find what:” box, enter the programme ID of the first result in the table, in the “Replace with:” box, enter REPEAT.
- Click “Find All” – this will show you all of the instances where the ID appears in the table (the ID also appears in the URL of the programme, but this can be ignored, as the duplicate will have been indicated in the programme ID column).
- Select all but the URLs and the first incidence of the ID (CMD + left click), then click “Replace All”, then “OK” (Figure 21). The resulting spreadsheet should look like the one in Figure 22.
Figure 21: Select “Replace All” to flag duplicate programme IDs
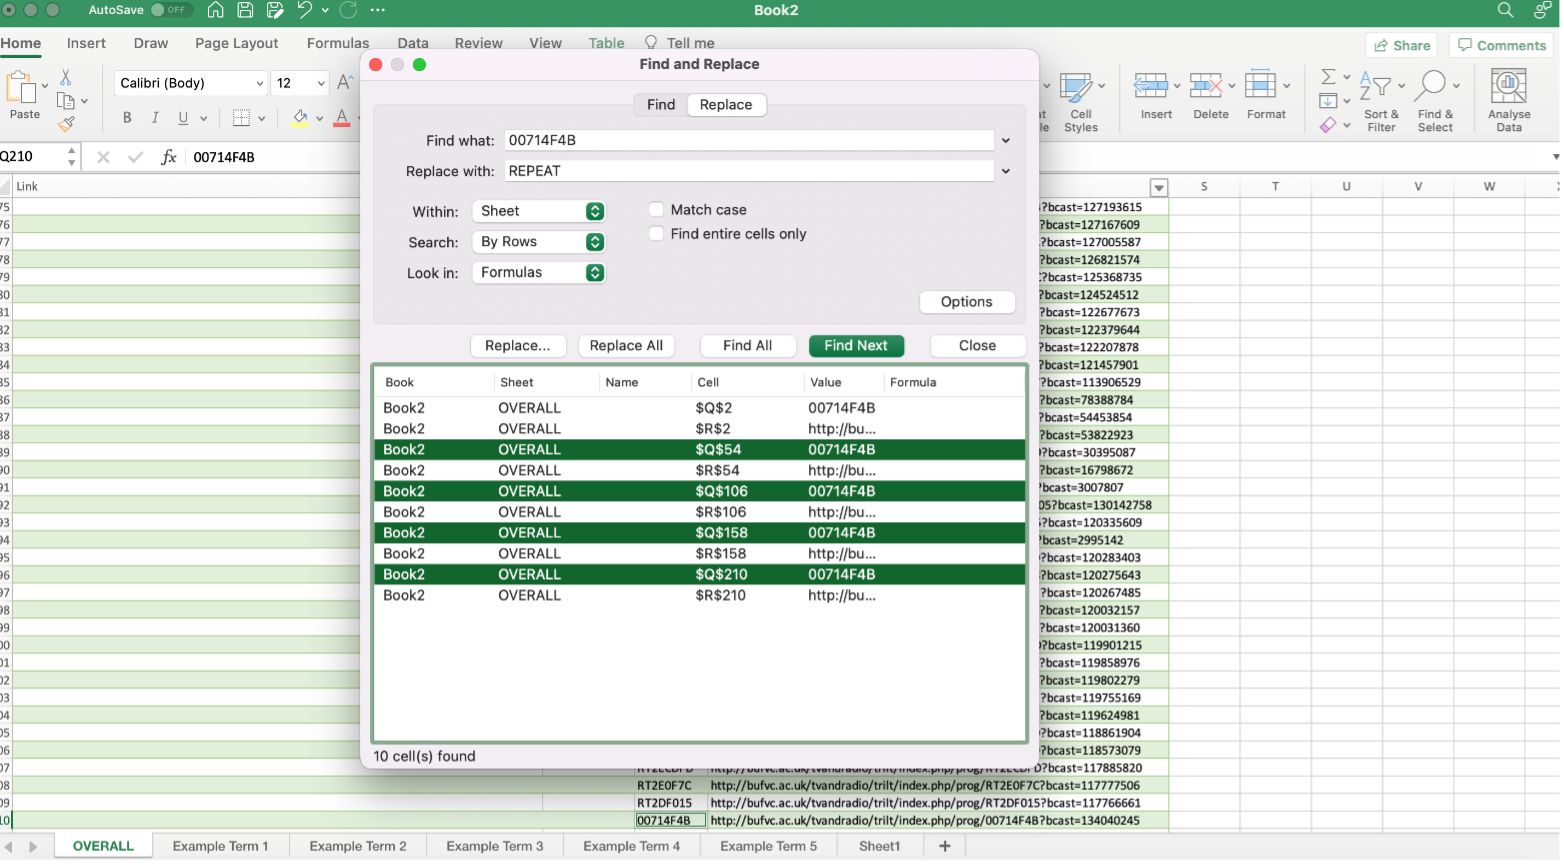
Figure 22: The final spreadsheet should be a simplified list of all genuine results
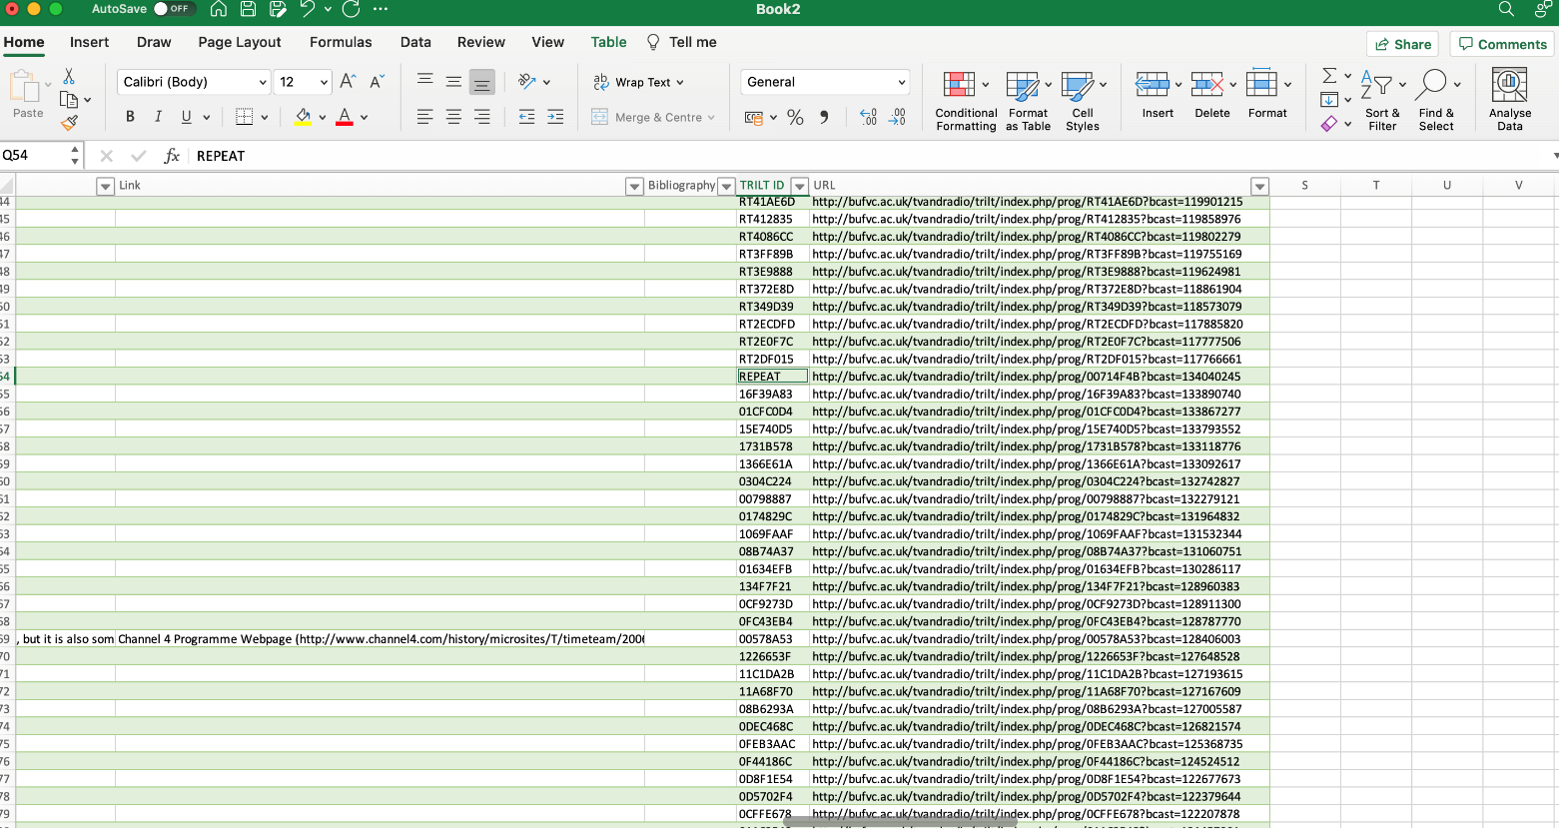
- If you close the pop-up, you can see that duplicate IDs have been replaced by “REPEAT” – where this has occurred, the duplicate result can be manually removed. This can be done before or after the above steps have been repeated for each new programme ID.
Duplicates that have occurred as a result of being Sign Language enabled (they have different programme IDs but are the same programme) can also be highlighted, if you wish to do so, by using the “Find & Replace” tool; in the “Find what:” box, enter Sign Zone and in the “Replace with:” box, enter REPEAT and then follow steps 3-5 above.
